Connecting a continuous or hardwire kit
, by Allcam dashcams, 7 min reading time
, by Allcam dashcams, 7 min reading time
Manual for installing a 2- or 3-wire permanent power cable at your car's fuse box.
Installing a continuous or hardwire kit is necessary for many dashcams to use parking mode. Often, installing a hardwire kit for your dashcam is also nicer and more convenient than using the cigarette power supply. After all, you keep the cigarette power supply free for other devices and have fewer cables running through your car.
The hardwire kit is usually connected at the car's fuse box. This is because the fuse box contains all the necessary connection points for the hardwire kit and this is where the cables can be safely and easily connected. In principle, the power supply can also be connected to any other power point in the car, such as near the radio or other place in the interior. However, you will then have to remove parts of the interior and solder the cables in most cases. In this guide, we will therefore restrict ourselves to installation at the fuse box.
Installing a continuous or hardwire kit is relatively simple and can be done in about an hour with some technical knowledge and the right tools. You can also go to your dealer or garage to install the power supply in most cases.
Note: Installing a hardwire kit yourself may affect your car's warranty.
For a quick and easy installation, we offer a complete installation kit worth €19.50. This includes a voltage detector, cable trimmer, tie-wraps and cable clips as well as two of all four types of Add-a-Circuit fuse holders. These fuse holders are needed to neatly connect the cable to the fuses. Some hardwire kits come with fuse holders as standard.
The black cable goes to earth, which does not require a fuse holder. A separate type of fuse holder is available for each type of fuse (depending on the make and model of car): Standard, Mini or Micro, or Micro2. Before purchasing, check which type of fuses are used in your car (there may be more than one):

Some power supplies already have a Mini/ATS fuse on both cables as standard. If your car uses these types of fuses and you have two free spots (continuous and switched) left, you can simply place these fuses there. If your car does not have Mini fuses or you do not have any suitable free spots, you will still have to use a fuse holder. You then cut the Mini fuses from the cable and place the stripped end in the shell of the fuse holder (see step 5 of the installation below).
In addition to the fuse holders, you will need the following tools to install a hardwire kit:
- Screwdriver/Wrench - to access the fuse box.
- Stripper or cutter - to prepare the wire.
- Point pliers - to remove a fuse.
- Cable clamp pliers - to clamp the cable if you are using a fuse holder.
- Voltage Finder or Multimeter - to see at which points there is current and test the power supply.
- Cable clips + Carpenter - to hide the cable nicely later.
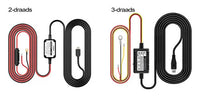
We roughly distinguish between two types of hardwire kits; 2-wire and 3-wire hardwire kits. It is important to know in advance which type of power supply you have and how to install it. A hardwire kit always has one black wire for the Earth, so depending on the type of power supply, there are one or two more wires to be connected to a power point.
A 2-wire permanent power supply is the simplest variant of a hardwire kit with one wire connected to a power point and one for Earth. You have two options when installing it:
- Permanent power point: The power supply provides continuous power, even when the ignition is switched off. The dashcam will therefore stay on during parking and you can use the Parking mode if necessary.
- Switched power point: the power supply provides power only when the ignition is switched on. This installation actually works as a replacement for the cigarette power supply and the dashcam will switch on and off with the ignition. Use of parking mode is therefore not possible.
This is the most advanced variant of a hardwire kit with two wires connected to different power points and one wire for earth. These types of power supplies can usually only be connected in one proper way*.
- Battery/B+/Power/VCC: To a continuous power point that also supplies power when the ignition is switched off.
- ACC: To a switched-mode power point that only supplies power when the ignition is switched on.
The colour of the cables (Yellow or Red) differs per type of hardwire kit, so always read the labels and/or manual of the power supply carefully. With a 3-wire power supply, the ACC (Accessory) cable sends a signal to the dashcam when the car ignition is turned on and off.
* Note: For some dashcams, a 3-wire hardwire kit is recommended or supplied while those dashcams do not support Automatic parking mode. In those cases, the ACC cable can be cut or isolated and the Continuous power supply can be installed as a 2-wire Continuous power supply. The exception is Motocam dashcams, in which the yellow wire does need to be connected as otherwise the dashcam will not start.
You can now start installing the power supply. Make yourself comfortable and do this preferably on a sunny day or in a well-lit garage.

First determine where the dashcam will hang in the car. We recommend always placing the camera out of sight, in a place where it does not obstruct the view from the car. In this case, we hang the camera behind the interior mirror. From the spot where the dashcam will hang, the cable can be concealed.
Check the car's manual to see where the fuses are located. Usually they are located near the foot end on the driver's side at the bottom of the dashboard and covered with a removable cover or flap. In our case, the fuses can also be found on the driver's side.

Start by roughly routing the cable, starting from the dashcam. This way, you will later know how much cable is left and you can start installing the power cable. If necessary, you can cut a length of cable so you don't have too many wires left.

Use a ‘voltage detector’ to determine which fuse provides power when the engine is on or off. The car's manual usually shows this as well. Normally, for example, the fuse for the brake lights or horn is continuously energised and the one for the (dashboard) lights is not.

To install the cable, you need to remove the fuse you want to use with, for example, a pair of pointed pliers. With a pair of stripping pliers, you can remove the sheath from the cable so you can insert it at the fuse.

Are you using a fuse holder? Then insert the fuse holder in the place where you just removed the fuse. Then insert the fuse itself back into the fuse holder, together with the fuse that came with the fuse holder. That way, both points are fused. The cable from the Continuous power supply is inserted into the cylinder of the fuse holder and then pinched with a pair of cable clippers.


The black lead of the cable should be attached to a grounding point. This is a point connected to the car's chassis. Usually such a point can be found near the fuses, it can often be identified by a screw or nut to which other cables are also attached. Check the car's manual if necessary.

Check again that the cable is properly attached at all points. If it is, check that the dashcam works. If this is also the case, you can reinstall any panels that have been removed and hide the cable more neatly.